Database Source
In This Topic
Function Name |
Database Source | ||||||
Category |
Database | ||||||
Icon |
 |
||||||
Description |
Defines the data that will be read from a relational database. | ||||||
Inputs |
|||||||
Outputs |
|
||||||
Properties |
|
||||||
Usage
The Data Mapper allows you to map from source to target data structures, applying transformations to your data at the same time. When embarking on a mapping project, the first thing you need to do is define the source and target data structures you are working with. The Database Source component allows you to specify all aspects of your data source.
To begin, drag the Database Source component from the Database section of the Component Palette onto a new Data Mapper file.
This will cause the data source wizard to launch

In order to bind to a database it must be configure as a global Database Connection. Database connections can be created via the Database Explorer Window or via the 'New Connection' button on the wizard.
The database creation screens are standard windows functionality, refer to online sources for configuring them.
Once a data base connection is selected, we can move onto the next wizard page with the next button.
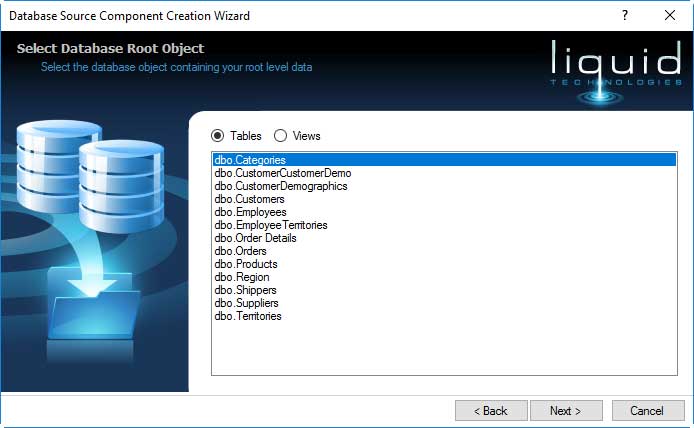
The next page shows all the user tables within the database. This is a starting point for the data you will be loading.
Pick a table that is at the root of the output data you are trying to extract, so if you want to extract all the orders for each customer then select the Customer table.

By default the DataSource will read all the data from the source data table and any linked tables. In a large database this can be huge amounts of data. In order to reduce the data read an SQL WHERE clause can be used which will reduce the quantity of data read.
The 'WHERE SQL' must start with keyword 'WHERE' and MUST use the name 'TableAlias' when referencing columns within the source table.
Failure to use the TableAlias will result in errors (i.e. "WHERE Country = 'USA'" could fail you should use "WHERE TableAlias.Country = 'USA'")
Failure to use the TableAlias will result in errors (i.e. "WHERE Country = 'USA'" could fail you should use "WHERE TableAlias.Country = 'USA'")
The WHERE clause can also be parameterized to allow values to be taken from within the transform.

Once you have completed your WHERE Clause it can be tested with the Test button, the results are shown in dialog.
It is advisable to test the query before exiting the wizard.
If you want to test the query then you need to provide default values for all of the parameters as you define them.

For complex queries it is recommended that you build and test them in your standard database tools, and then cut and paste the SQL into this dialog.
When the wizard is complete pressing the Finish button will created the Database Source on the transform.

If your database is well structured with constraints then all the associated tables are added as child elements, so there is no need to manually join in other related tables.
If you database does not contains the constraint you need to model then you can create multiple database sources and join them manually.
Once on the transform the Database source can be used like any other data source.
See Also